Raspberry ( Raspbian : stretch ) / Git Server : Installation en bref

Etape n°1 : Installation de l’OS ( 2018-06-27-raspbian-stretch-lite.img )  sur la carte SD ( Avec ApplePi si vous êtes sous MacOS ) .

-> Voir : https://www.cyber-neurones.org/2018/09/raspberry-mac-os-applepi-baker-creer-une-carte-sd-pour-le-raspberry/ .

$ hostnamectl
   Static hostname: raspberrypi
         Icon name: computer
        Machine ID: e3de61955d6646558bc520db1abbc48c
           Boot ID: 38574747c8294acab1c292cb2c8023c4
  Operating System: Raspbian GNU/Linux 9 (stretch)
            Kernel: Linux 4.14.50-v7+
      Architecture: arm

Etape n°2 : Changement de l’IP.

-> Voir : https://www.cyber-neurones.org/2018/09/raspberry-configuration-reseau-sur-une-raspbian-gnu-linux-9-stretch-avec-une-freebox/ .

Modification de /etc/dhcpcd.conf , mais aussi de /etc/hostname (pour le nom RASP7, et oui le 8ème Raspberry : 192.168.0.76 ) . Le login : pi et le mot de passe raspberry (enfin rqspberry )

Et lancement du service ssh ( afin de supprimer écran/clavier et faire à distance ).

$ sudo systemctl enable ssh.service
$ sudo systemctl start ssh.service
$ sudo apt-get upgrade
$ sudo apt-get update

Changement du mot de passe ( commande passwd ) … et reboot.

Etape n°3 :  Installation de GIT

$ sudo apt-get install wget git-core git
$ sudo apt-get install -y usbutils

Création de l’utilisateur et du groupe git

$ sudo adduser --disabled-password --gecos "" git && echo "git:git"
$ sudo passwd git
Enter new UNIX password: 
Retype new UNIX password: 
passwd: password updated successfully

Création du répertoire pour les sources :

$ sudo mkdir /sources
$ sudo mkdir Projet1.git
$ sudo chown -R git.git /sources
$ sudo -u git git init --bare
Initialized empty Git repository in /sources/Projet1.git/

Le but est ensuite de le déplacer vers un composant USB …

Ensuite on va sur le client :

$ git init
$ git remote add master git@192.168.0.76:/sources/Projet1.git
$ git add *
$ git commit * -m "Orgin"
$ git push origin master
git@192.168.0.76's password: 
Counting objects: 3, done.
Delta compression using up to 8 threads.
Compressing objects: 100% (2/2), done.
Writing objects: 100% (3/3), 1.30 KiB | 1.30 MiB/s, done.
Total 3 (delta 0), reused 0 (delta 0)
To 192.168.0.76:/sources/Projet1.git
 * [new branch]      master -> master

Etape n°4 : Interface graphique et test .

Installation d’une interface graphique :

$ curl https://raw.githubusercontent.com/alberthier/git-webui/master/install/installer.sh | bash
  % Total    % Received % Xferd  Average Speed   Time    Time     Time  Current
                                 Dload  Upload   Total   Spent    Left  Speed
100  1855  100  1855    0     0   3506      0 --:--:-- --:--:-- --:--:--  3513
Cloning git-webui repository
Cloning into '.git-webui'...
remote: Enumerating objects: 48, done.
remote: Counting objects: 100% (48/48), done.
remote: Compressing objects: 100% (38/38), done.
remote: Total 48 (delta 4), reused 33 (delta 2), pack-reused 0
Unpacking objects: 100% (48/48), done.
Enabling auto update
Installing 'webui' alias

Je repasse sous le serveur pour faire un test :

$ git clone git@192.168.0.76:/sources/Projet1.git
Cloning into 'Projet1'...
git@192.168.0.76's password: 
remote: Counting objects: 3, done.
remote: Compressing objects: 100% (2/2), done.
remote: Total 3 (delta 0), reused 0 (delta 0)
Receiving objects: 100% (3/3), done.
$ cd Projet1/
pi@raspberrypi:~/Projet1 $ git webui
Serving at http://localhost:8000

J’ai bien une interface Web sur http://192.168.0.76:8000 …
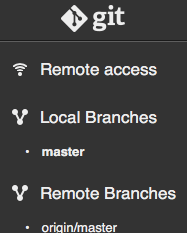
C’est donc simple et facile … il faut pas s’en passer 🙂

Etape n°5 : Installation de MUNIN ( comme toujours )

Le client MUNIN :

$ sudo apt-get install munin munin-node munin-plugins-extra libnet-snmp-perl
$ sudo nano /etc/munin/munin-node.conf
...
allow ^127\.0\.0\.1$
allow ^192\.168\.0\.80$
allow ^::1$
...
$ sudo munin-node-configure --shell  | sh -x

Sur mon serveur MUNIN ( 192.168.0.80 ) :

$ sudo vi /etc/munin/munin.conf 
...
[RASP8-GIT]
    address 192.168.0.76
    use_node_name yes
...
$ sudo su - munin --shell=/bin/bash
$ /usr/share/munin/munin-update --nofork --debug
$ exit
$ sudo service munin-node restart


Raspberry/Munin : Plugin pour Awox pour suivre la consommation.

La première étape est de voir si le Bluetooth est bien lancé au démarrage :

$ dmesg | grep -i blue
[   11.903994] Bluetooth: Core ver 2.22
[   11.904056] Bluetooth: HCI device and connection manager initialized
[   11.904073] Bluetooth: HCI socket layer initialized
[   11.904080] Bluetooth: L2CAP socket layer initialized
[   11.904098] Bluetooth: SCO socket layer initialized
[   11.913494] Bluetooth: HCI UART driver ver 2.3
[   11.913506] Bluetooth: HCI UART protocol H4 registered
[   11.913509] Bluetooth: HCI UART protocol Three-wire (H5) registered
[   11.913652] Bluetooth: HCI UART protocol Broadcom registered
[   12.098214] Bluetooth: BNEP (Ethernet Emulation) ver 1.3
[   12.098223] Bluetooth: BNEP filters: protocol multicast
[   12.098245] Bluetooth: BNEP socket layer initialized

$ sudo systemctl status bluetooth*
● bluetooth.target - Bluetooth
   Loaded: loaded (/lib/systemd/system/bluetooth.target; static; vendor preset: enabled)
   Active: active since Tue 2018-10-09 16:17:10 UTC; 2 days ago
     Docs: man:systemd.special(7)

Warning: Journal has been rotated since unit was started. Log output is incomplete or unavailable.

● bluetooth.service - Bluetooth service
   Loaded: loaded (/lib/systemd/system/bluetooth.service; enabled; vendor preset: enabled)
   Active: active (running) since Tue 2018-10-09 16:17:10 UTC; 2 days ago
     Docs: man:bluetoothd(8)
 Main PID: 812 (bluetoothd)
   Status: "Running"
   CGroup: /system.slice/bluetooth.service
           └─812 /usr/lib/bluetooth/bluetoothd

Warning: Journal has been rotated since unit was started. Log output is incomplete or unavailable.

A noter pour que cela fonctionne bien j’ai du ajouter le service hciuart :

$ sudo systemctl enable hciuart
$ sudo systemctl start hciuart
$ systemctl status hciuart.service
● hciuart.service - Configure Bluetooth Modems connected by UART
   Loaded: loaded (/lib/systemd/system/hciuart.service; enabled; vendor preset: enabled)
   Active: active (running) since Tue 2018-10-09 16:17:10 UTC; 2 days ago
 Main PID: 803 (hciattach)
   CGroup: /system.slice/hciuart.service
           └─803 /usr/bin/hciattach /dev/serial1 bcm43xx 3000000 flow - b8:27:eb:23:8b:15

Warning: Journal has been rotated since unit was started. Log output is incomplete or unavailable.

Je vais me servir du projet suivant : https://github.com/sourceperl/smartplugctl ( Little utility for control Awox BLE smartPlug SMP-B16-FR : http://www.awox.com/wp-content/uploads/2016/07/User_Guide_SMP-B16.pdf ) .
Voici donc la liste des commandes pour faire un plugin pour Munin afin de mieux suivre la consommation :

$ sudo apt-get install -y python-pip libglib2.0-dev
$ sudo pip install bluepy
$ sudo apt-get install -y python-setuptools
Reading package lists... Done
Building dependency tree       
Reading state information... Done
python-setuptools is already the newest version (33.1.1-1).
python-setuptools set to manually installed.
0 upgraded, 0 newly installed, 0 to remove and 44 not upgraded.
$ git clone https://github.com/sourceperl/smartplugctl.git
$ cd smartplugctl
$ sudo python setup.py install

Une fois l’installation faite, on fait un SCAN afin d’avoir la référence du AWOX :

$ sudo smartplugscan

Pour faire un scan, on peut aussi faire :

$ sudo hcitool lescan --duplicates

Ou encore

$ sudo bluetoothctl 
[NEW] Controller B8:27:EB:23:8B:15 RASP3 [default]
[bluetooth]# power on
Changing power on succeeded
[bluetooth]# agent on
Agent registered
[bluetooth]# default-agent
Default agent request successful
[bluetooth]# scan on
Discovery started

A noter aussi que pour supprimer l’erreur : « Failed to obtain handles for « Service Changed » characteristic »

$ sudo systemctl status bluetooth.service
● bluetooth.service - Bluetooth service
   Loaded: loaded (/lib/systemd/system/bluetooth.service; enabled; vendor preset: enabled)
   Active: active (running) since Thu 2018-10-11 20:07:44 UTC; 4s ago
     Docs: man:bluetoothd(8)
 Main PID: 1079 (bluetoothd)
   Status: "Running"
   CGroup: /system.slice/bluetooth.service
           └─1079 /usr/lib/bluetooth/bluetoothd

Oct 11 20:07:43 RASP3 systemd[1]: Starting Bluetooth service...
Oct 11 20:07:44 RASP3 bluetoothd[1079]: Bluetooth daemon 5.43
Oct 11 20:07:44 RASP3 systemd[1]: Started Bluetooth service.
Oct 11 20:07:44 RASP3 bluetoothd[1079]: Starting SDP server
Oct 11 20:07:44 RASP3 bluetoothd[1079]: Bluetooth management interface 1.14 initialized
Oct 11 20:07:44 RASP3 bluetoothd[1079]: Failed to obtain handles for "Service Changed" characteristic
Oct 11 20:07:44 RASP3 bluetoothd[1079]: Sap driver initialization failed.
Oct 11 20:07:44 RASP3 bluetoothd[1079]: sap-server: Operation not permitted (1)

Il faut faire:

 sudo sed -i 's|^ExecStart=/usr/lib/bluetooth/bluetoothd$|ExecStart=/usr/lib/bluetooth/bluetoothd --noplugin=sap|' /lib/systemd/system/bluetooth.service

A noter aussi qu’il faut faire ceci :

$ sudo adduser pi bluetooth
$ newgrp bluetooth

Cela permet aussi de débloquer certains problèmes de droits, ..

La fin de l’article a été supprimé, car AWOX n’est pas de bonne qualité ….

Raspberry : Architecture : Interrogation écrite !

Petit rappel sur l’architecture mis en place sur le Munin :

Maintenant, quel est la meilleure architecture pour la mise en place du Logstach ? Mettre un Filebeat sur tous les serveurs ou bien envoyer les informations via Rsyslog afin d’avoir qu’un seul Filebeat ? Vous avez une heure …

Raspberry : Disque SSD vs Carte SD

La carte est Micro SD : Carte Mémoire microSDXC SanDisk Ultra 64GB

Le disque SSD : Kingston SSD A400 – 120GB Disque SSD (2.5″ , SATA 3)

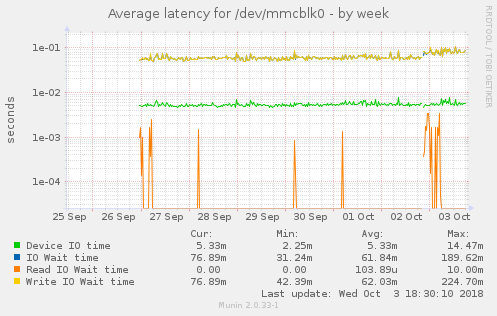
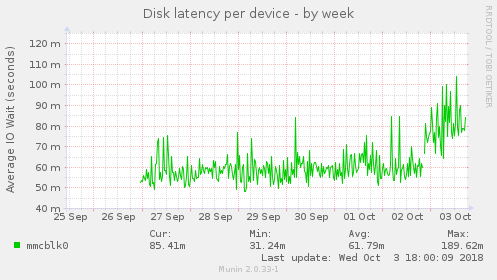
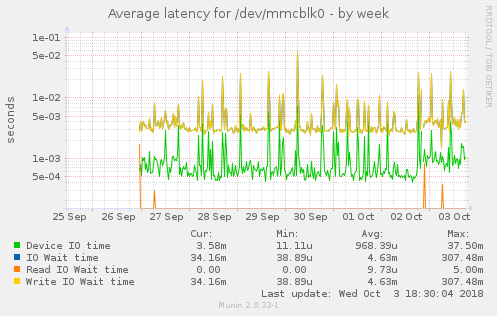
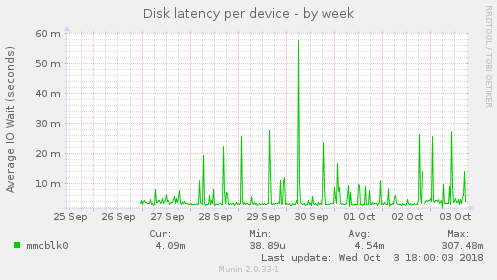
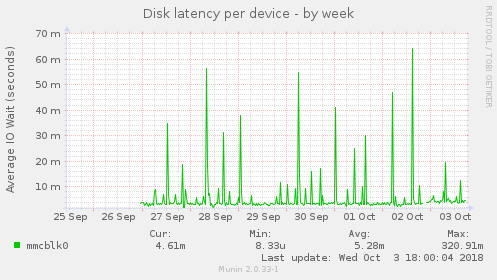
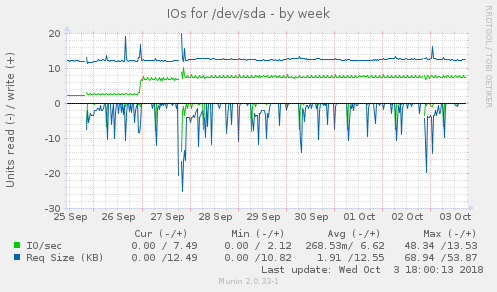
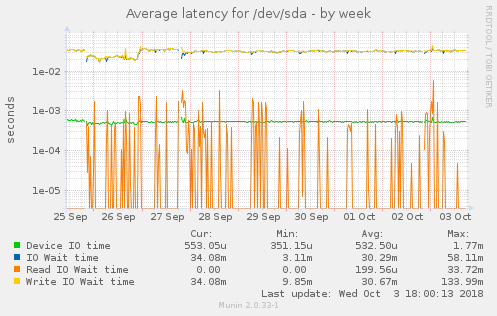
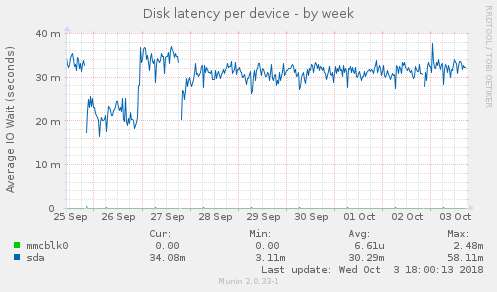
J’ai donc mes premières statistiques via Munin :

– RASP n°1 : Carte Micro SD : Révision 000f

  • Min : 31.24m
  • Avg : 61,79m
  • Max : 189,62m

– RASP n°3 : Carte Micro SD : Révision a020d3

  • Min : 38,89u
  • Avg : 4,54m
  • Max: 307,48m

– RASP n°4 : Carte Micro SD : Révision a020d3

  • Min : 8,33u
  • Avg : 5,28m
  • Max : 320,91m

– RASP n°2 : Disque SSD : Révision a22082

  • Min : 3,11m
  • Avg : 30,29m
  • Max: 58,11m

En moyenne la carte MicroSD est largement devant, par contre le Max de la carte MicroSD est très important par moment.

A suivre.